WebRTC not connecting? Let’s build a relay server!
2022-08-21 2022-08-21
This article introduces the procedure for creating a server that relays communications to use streaming functions via websocket over the Internet.
WebRTC may not be able to connect due to network security measures. In particular, most organizations, such as companies and schools, have firewalls in place. In such cases, it may not be possible to connect due to communication port limitations, etc., and it may be difficult to get a nice response from the security staff to see if this can be worked around.
Therefore, I will introduce the procedure for creating a server that relays websocket communications in order to be able to communicate over the Internet using websocket communications without using WebRTC.
Let’s build a relay server
Prepare a relay server
First, prepare a server with a known global IP as a relay server. The server can be AWS, VPS, or whatever you prefer. If you don’t have a server available or want to try it out separately and easily, we recommend the $5USD/month Nanode plan from Linode (recently acquired by Akamai). Servers can be created and immediately dumped on an hourly basis. Since there is no pay-as-you-go billing, there is no need to worry about using it for video communications with large amounts of data.
If you sign a new server contract, setup minimum security measures. What you need to know about them can be found on the web.
For this article, we assume that the relay server has Ubuntu installed. The working PC is assumed to be a Mac.
Creating a dedicated user for port forwarding
The viewer and camera communicate in both directions. Communication between the relay server and the camera device uses ssh port forwarding. In order to use port forwarding, it is necessary to create an environment that allows users to log in to the relay server via ssh from the camera device. However, since it is not desirable to allow users to log in and perform various operations, we will create a “user with only the minimum necessary privileges” and use that user for ssh.
Log in to the relay server.
First, add a user, where portforward_user is the user name. You can replace it with any name you like.
$ sudo adduser portforward_user
Create a shell rbash with restricted permissions (if not already there)
$ ln -s /bin/bash /bin/rbash
#If it already exists, an error is displayed. ln: failed to create symbolic link '/bin/rbash': File exists
Register rbash in /etc/shells. However, this is not necessary if rbash originally exists. (Here, nano is used as the text editor. You can use whatever you like.)
$ sudo nano /etc/shells
...
/bin/csh
/bin/ksh
/bin/zsh
/bin/rbash #Add this line
Switch user.
$ su - portforward_user
Switch shells. The shell will now be rbash (restricted bash).
$ chsh
Password: #No password
New shell [/bin/bash]: /bin/rbash #Enter /bin/rbash
Use public key authentication to make ssh connections secure and easy. Create public and private keys on your work PC. Execute the following command and you will be asked for a file name, so name it as you like. In this case, we will use pf_rsa.
@your work PC
$ cd ~/.ssh #If not exit, mkdir ~/.ssh
$ ssh-keygen -t rsa
Restrict privileges.
@your work PC
$ chmod 600 ~/.ssh/pf_rsa
Steps from this point on will be performed by the relay server
Create ssh directory (if not already there)
$ su - portforward_user
$ mkdir ~/.ssh
Copy and paste the contents of the .pub file generated by ssh-keygen.
$ nano ~/.ssh/authorized_keys
Limit privileges.
$ chmod 600 ~/.ssh/authorized_keys
Log in again as root.
$ su -
Change the user and group in the .bash_profile in the portforward_user‘s home directory to root and set access rights so that only root can make changes. If there is no .bash_profile, do the same in .profile.
$ cd /home/portforward_user
$ chown root .bash_profile #Change the owner to root. If there is no .bash_profile, then .profile
$ chgrp root .bash_profile #Change group to root. If .bash_profile is not present, then .profile
$ chmod 755 .bash_profile #Change access rights. If .bash_profile is missing, then .profile
Configure portforward_user to be able to use ssh.
$ nano .bash_profile #If .bash_profile is missing, then .profile
# Add the following statement to the bottom line
export PATH=/home/portforward_user

$ ln -s /bin/ssh /home/portforward_user/ssh
Firewall Settings
The port for communication must be open.
Here is an example of using ufw as a firewall.
Install it first (if you don’t have it).
$ sudo apt-get install ufw
Open port.
$ sudo ufw allow 8080
$ sudo ufw allow 80
$ sudo ufw allow 22
Activate and start the service.
$ systemctl enable ufw
$ systemctl start ufw
$ sudo ufw enable
Remarks: Condition check
$ sudo ufw status
Varnish
Varnish is a reverse proxy. It is usually used as a CDN, but this time it is used as a function to relay communication between viewers and camera devices. The viewer sends a request to a global IP relay server, which is then received by Varnish and passed on to the camera device’s port forwarding.
Install Varnish.
$ sudo apt-get install varnish
Change the Varnish listening port.
$ sudo nano /etc/systemd/system/multi-user.target.wants/varnish.service
# Change -a :6081 to -a :80
Modify the configuration file to relay Websocket to connect to the camera device port forwarding.
Rename and back up the default file.
$ sudo mv /etc/varnish/default.vcl /etc/varnish/default.vcl.bak
Open a new file…
$ sudo nano /etc/varnish/default.vcl
Write the following.
vcl 4.0;

import std;

backend default {
    .host = "127.0.0.1";
    .port = "8080";
}

sub vcl_recv {
    if (req.http.upgrade ~ "(?i)websocket") {
        #if (!std.fnmatch("*k=your_key", req.url, 0)){
            #return(synth(403, "Access denied"));
        #}

        return (pipe);
    }
    return (pass);
}

sub vcl_pipe {
    if (req.http.upgrade) {
        set bereq.http.upgrade = req.http.upgrade;
        set bereq.http.connection = req.http.connection;
    }
}

sub vcl_backend_response {
}

sub vcl_deliver {
}
Reboot to apply changes.
$ systemctl daemon-reload
$ sudo systemctl restart varnish
Connect
On the Camera Device
Open two terminals.
Terminal 1:
For IP_OF_RELAY in the following command, enter the IP of the relay server. The command connects port 8080 on the remote side to port 9001 on the local side; if the ssh port number has been changed, change the -p number accordingly.
ssh portforward_user@IP_OF_RELAY -i ~/.ssh/pf_rsa -R 8080:localhost:9001 -p 22
Terminal 2:
Execute the pserver startup command.
See this link for commands.
https://blog.picam360.com/startpicam360withjetsonnano-6/
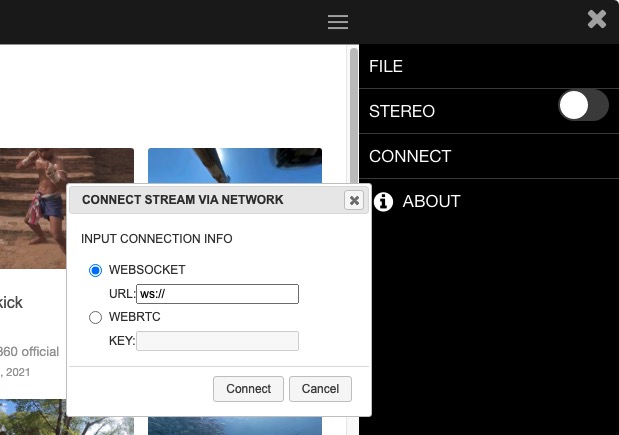
On the Viewer
Select WEBSOCKET. Enter the IP address and port of the relay server in the WEBSOCKET field of the application.
ws://IP_OF_RELAY:80
These are the steps for creating a relay server. We hope this article will be of help to you.
Picam360 Links:
- Web Site: https://www.picam360.com
- Web Store: https://store.picam360.com
- Twitter: https://twitter.com/picam360
- Facebook: https://www.facebook.com/Picam360/